Wednesday, June 2, 2021

From Rescue to Resculpt: Luna! (Thank you, Devon!) (UPDATED - COMPLETE!!)

Hey Magicians!! 

    It's been a long time since my last update (school!) and, alas, it will likely be awhile before I can update this post again.  I have a very busy summer training schedule, so I wasn't able to finish this project before I had to leave home again.

    However, I wanted to give you guys a quick update to show you where I am on this project, because it's been such a great time so far and I'm almost finished!

    Recently, a certain very awesome Devon (who follows this blog and my channel) reached out to donate a damaged Stablemate found in a toy lot.  Devon's a collector as well, preferring MLP and 1980s fashion horses, and so we connected over the sentiment that well-loved toy horses deserve better stables than a dusty thrift shop shelf!

(TW: There is some light model-horse gore in this post!)

    The little horse arrived in some seriously goregous packaging.  Thank you, Devon!


And here she is!  She's on the 1998 G2 Paso Fino mold by Kathleen Moody, a perennial favorite.  Her coloration is a rich blood bay with two stockings on her back legs.  Sadly, it seems she's also had one too many adventures, and both her front legs are snapped off at the knee!


At first, I was just going to try and rebuild her original legs.  I have other horses on the same mold, so that would have been the easiest route.  But then, I realized she could still stand by herself even with the broken legs, just tilted forward.  And that made me think about how some horses are trained to "bow" for shows:

So, I decided to just run with the inspiration and resculpt her front legs into a kneel.
The first step was to reposition her right shoulder.   I used a Dremel Stylo to do the dirty work.


I also smoothed out the broken-off ends of the upper legs and make small indentations for the armature wires.

Next, I used hot glue to re-attach the right upper leg at the correct angle.


I also needed to break off the left hoof and reposition it, since it needs to be fully on the ground instead of bending back.


More hot glue helped me attach two pieces of wire at the knees, to serve as the armatures for sculpting in the forelegs.


Here's the basic idea!

As usual, I then started using Apoxie Sculpt to start filling in the forelegs.  The first pass was very rough, with the legs looking a bit like baseball bats!


I also reinforced the joint where I repositioned the left hind hoof.


On the second pass, I started to smooth things out, add some detail to the shoulder muscles, and define the cannon.
I also realized that I needed to bend the tail downwards, since otherwise the hair wouldn't be hanging naturally (now that she's tilted forward).  I Dremeled out some plastic from under the tail to let me bend it down, then filled in the gap with more Apoxie.

On the third pass, I kept smoothing out the shoulders, and also began to define the shape of the ankles and hooves.


On the fourth pass, I focused on fetlocks, pasterns, and hooves themselves.  I had never actually sculpted a proper horse lower leg before, since I usually just add feathering to cover everything up, so this pass took ages!


I also filled out the forelock and front portion of the mane, sweeping the hair forward so it dangles at a more natural angle for the forward tilt of her neck.


I also finished detailing the upper tail and the repositioned rear foot.

The fifth and final pass was a combination of sanding and adding tiny bits of Apoxie to smooth everything out and add details and definition.


To help tie everything together, fill in micro-gaps, and create a base for the paint job, I coated her with black acrylic.  Here she is so far!


I haven't been able to paint her yet, but am very excited with how she's coming along so far!  Because of my schedule, I won't be back at my workshop for a few weeks, but when I do, I will make sure to update this post with some post-painting photos.

Devon has chosen a lovely name: Luna!  And, her coat color will be a luminous dapple grey, inspired by this lovely carousel horse:

I think the name and color suit her beautifully, and I can't wait to get painting!

Update: Happy Fourth of July to my American friends! I'm finally back home for a few days, and of course painting Luna was the first thing on my list.

First coat....(patchy!)

Second coat....(less patchy!)

Blending out the dark grey base coat!

First coat of dapples.  I use a medium gray and blend each one out with a Q-tip.

She's getting a stripe and three socks.  I started adding them in here, along with some white fading at the bottom of her tail.


Dapples time!  I can't use a toothbrush for dapple greys (like I can for roans), because the dapples are bigger and need to follow the direction of the hairs on the coat.  So I hand painted about a million dapples with the tiniest paintbrush ever.


Finishing eyes and hooves, pinking the muzzle, and sealing everything.  I like to add gloss to the mane, tail, nose, and hooves as well as the eyes.


And she's finally complete!


It's been a long journey for little Luna.  Again, thank you so much to Devon for rescuing her!
I made her a little blanket from some of the pretty tissue paper she came wrapped in.  It'll help keep dust off her paint job.

Thanks for reading and following Luna's story!
I have to go back to school tomorrow morning for my last assignment of the summer, which goes straight into the school year.  I have many projects planned, never fear!  It just might be a little while before I manage to upload anything.

But until next time, 

Bye Magicians!

~Miniature_Magic


Thursday, July 9, 2020

CUSTOM: Stablemates Sleipnir!

Hey Magicians!

Today I'll be sharing the result of a long-running project that I'd been planning for a few years!  It was inspired by a few things, but mainly my experience playing Dungeons and Dragons and my longtime obsession with Norse mythology
However, it was only after seeing the magnificent Schleich-based Sleipnir model created by Shoestring Stable that I decided to give a Stablemates-based version of this mythological horse a go.
According to the Viking mythos, Sleipnir is the eight-legged horse ridden by the god Odin and occasionally lent to various human heroes (like Sigurðr).  Sleipnir was said to be a son of Loki, and was the "best of all horses."

Unfortunately, I could not find most of the photos I took of the process of creating Slepnir (which began over winter break of 2019-2020).  The only one I could find was this one, which shows the four pieces I used to create him: 

As you can see, he was resculpted from a combination of the G3 Rearing Andalusian mold and the G2 Appaloosa mold.  I removed the center section of each body, then sandwiched the front and back of the Appaloosa in between the front and back of the Andalusian.  I attached the pieces with wire and hot-glue, then reinforced the bond with Apoxie Sculpt.

I also repositioned most of the legs so that he could stand a little better and so that the legs appear to be "flowing" from front to back (I hate to say this, but I imagine him moving a bit like a centipede.)

Next, I used more Apoxie to fill out his tail, smooth out the repositioned areas, and add some bulk on his face and feathering on his legs.  The feathering also helped to reinforce the joins at knees, hocks, and fetlocks, which had been weakened after the respositioning.  It took some serious sanding and Dremel-ing to smooth out all the lumps and bumps.


A bit of white paint and some more sanding helped to smooth things out and prime him for the final paint job:


As usual, the paint job goes in stages.  I wanted to make him a cross between a blue roan and a dapple grey, so I started with a dark grey base coat fading into black at the points:

Next, I faded the ends of his mane and tail and the feathering at the bottoms of his legs into white, and gave him shell-colored hooves:

Then, I added black roaning all over his body.  I get to use a toothbrush for this, so it's always my favorite part!

Finally, I added some light-grey spots on top of the roaning.  I also gave him a bald face, blue eyes, and some pinking on his muzzle.

And he's done!  I wish I had more photos of the process, because he looked really crazy for a long time, and I had my doubts about whether he would work out!  But, I'm super happy with how he finally turned out.  


(Yes, I made fan art.)

As always, feel free to comment below or email me at modelhorsemagic@gmail.com. And don't forget to check out my YouTube channel, Miniature_Magic, for unboxings, collection tours, DIY tutorials, and more.Bye Magicians!
~Miniature_Magic


Wednesday, July 8, 2020

No Two Horns: Stablemates Repaint Inspired by Native American History

Hey Magicians!

Today I'll be sharing something a little different.  This is a story I stumbled across while going down a rabbit hole in the American History class I took this semester.   The info in this post was obtained from the Lewis Art CafeWikipedia, and the Metropolitan Museum of Art website.

Anyway, while reading my American History textbook a few weeks ago, I noticed this picture:

It was provided as a shining example of the art produced by the Plains Indians, and the textbook said that it depicted a war horse, wounded in battle, making the final leap from life into death.  Intrigued, I did some independent research.

As it turns out, this statue is actually an effigy of a real horse that belonged to a Hunkpapa Lakota warrior named Joseph No Two Horns (He Nupa Wanica).  He was born in 1852 and soon became one of the most celebrated Plains Indians artists.  Besides creating the magnificent effigy above, he was also talented at drawing and engraving.  This is a piece he created, depicting himself stealing horses from another village!

Horses are a significant part of Lakota culture, and Lakota warriors used effigies or "dance sticks" depicting horses in their ceremonies.  However, the effigy at the top of this post is one of just a few known dance sticks that shows the entire body of the horse!  Most dance sticks only show the horse's head and maybe a hoof (like the one below, also created by Joseph No Two Horns).
No Two Horns was a warrior as well as an artist, and fought in over 40 battles, including the 1876 Battle of the Little Bighorn.  This was the battle that resulted in the defeat and complete destruction of General George Custer and the U.S. Army's 7th Cavalry Regiment by a combined force of Lakota and other Plains Indians. 
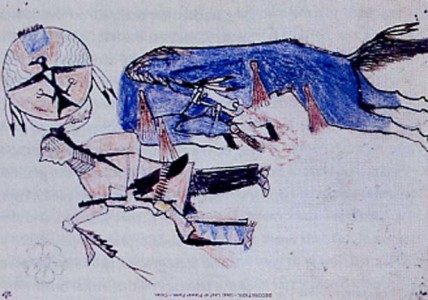
While No Two Horns survived this battle, his horse did not.  The blue roan stallion was literally shot out from under his rider, sadly passing away on the the battlefield from multiple bullet wounds.  By all accounts, the horse was a favorite of No Two Horns, and its death haunted him for the rest of his life.  He depicted the roan's death in several drawings like this one:
...and the effigy at the beginning of the post is also believed to be a depiction of this horse at the moment of death.  It bears traces of blue paint (the remnants of the blue roan coat) and has carved bullet wounds surrounded by red paint, as well as red horsehair dangling from the mouth to represent blood.  The eyes are brass tacks and the ears are pieces of leather.

The blue roan effigy is now one of the most famous pieces of Plains Indian art, and it's the symbol of the South Dakota State Historical Society.  It's currently at the Metropolitan Museum of Art in New York City, but unfortunately not on display (and I couldn't find many good photos!)

I thought the whole story was really interesting, and definitely worth sharing.  But, the reason that this on my Stablemates blog is that I decided to paint a Stablemate inspired by No Two Horns' beloved blue roan.
The model I chose to repaint was rescued off of Ebay and already had some paint on him:
I scraped off as much of the crusty primer and paint drips as I could, to get back the mold's detail:

....And repainted him with acrylics.  True to the original effigy and the drawing, the horse is a dark blue roan with four stockings and a white face marking.  I couldn't find a name for the original horse, so I named this model after the effigy's creator instead.

Meet No Two Horns. 


Thanks for reading!  Hopefully, you enjoyed this little mashup of history and model horses.  It's pretty different from usual, but I figured it was a story worth sharing.

As always, feel free to comment below or email me at modelhorsemagic@gmail.com.
 And don't forget to check out my YouTube channel, Miniature_Magic, for unboxings, collection tours, DIY tutorials, and more.
Bye Magicians!

~Miniature_Magic

DIY: Modifying store-bought Breyer accessories

Hey Magicians!
Yeah, it's happened to all of us.  We order a product or set from Breyer, and when it arrives, we are secretly disappointed.  The product isn't detailed enough, or its colors just don't look right.
Well, worry no more!  Just because a product was bought from Breyer doesn't mean it can't be improved.  There are many ways that you can repaint and modify standard Breyer products to make them more realistic and interesting.

Here are some examples, outlined in photos that I took before and after repainting a number of  Breyer accessories that have come in various sets.  You can do this with pretty much anything, the only rules are that you have to spray the plastic with matte sealer before AND after painting with acrylics, otherwise the paint will scratch off.  You can do this with jumps, tack sets, riders... the sky's the limit!

A boring green plastic jump...


...gets a pole repaint and looks much better.


A kinda cheesy-looking bright blue-and-green roll top jump...
...becomes a bit classier.


Some solid brown plastic tack sets...

...get remade into a black set and a variegated brown set.


Two English riders...

...get new coats and some details.

Two plain-Jane cowboys...

...are ready for the rodeo.


A lackluster rodeo clown...

...gets a colorful makeover.


Repainting store-bought accessories is one of the easiest ways to add some unique detail to your collection, particularly if you're trying to stage photos.  The sculpting on these miniatures is generally pretty incredible, but gets covered up by bad paint jobs.  Good thing it's so easy to fix!

As always, feel free to comment below or email me at modelhorsemagic@gmail.com.
 And don't forget to check out my YouTube channel, Miniature_Magic, for unboxing vids, collection tours, DIY tutorials, and more!
Bye Magicians!

~Miniature_Magic

Quick Update with Custom Repaints!

Hey Magicians!
I hope everyone is doing okay in these crazy times.  Stay well, you guys.

Anyway, since I haven't posted in a VERRRY long time (y'know, cause of school and the pandemic), I thought I'd let you guys know I'm still alive and doing art.
So, in this post, I'll share some before-and-after pictures of a couple of Stablemates that I've customized recently.
A few were bought unpainted from Breyer, and a few were rescued off of Ebay.  Most of the Ebay ones had some paint or primer on them already (like someone started customizing and then gave up) so if there's paint in the "before" photo, that's why.
And I'm sorting them by name, cause why not?

Deadbolt:

Diadem:


Dottie (No 'before' photo, but she was from the "Paint Your Own Farm" kit and plain white.)


 Flashbolt:


Neon Machine:


I repainted another horse called No Two Horns recently, but I'm going to make a separate post for him, because he's special and has background info.  ;)  More to follow.

As always, feel free to comment below or email me at modelhorsemagic@gmail.com.
 And don't forget to check out my YouTube channel, Miniature_Magic, for unboxing vids, collection tours, DIY tutorials, and more!
Bye Magicians!

~Miniature_Magic